Send Event log to Sentinel
Why send Event log
Security is an important issue these days. Sending security event logs to Sentinel provides an additional level of security for onPrem servers. For this, we rely on Azure Sentinel, the SIEM from Microsoft. However, this operation has an Azure cost, so it is preferable to limit the events sent to the necessary logs (security, defender, etc.) In this post we will first set up the transfer of events on a collector via WinRMS and then configure the sending in Sentinel
Configure Certificate for WinRMS
Before to setup WinRMS, you need to configure Active Directory Certificate Services (ADCS) to issue certificate.

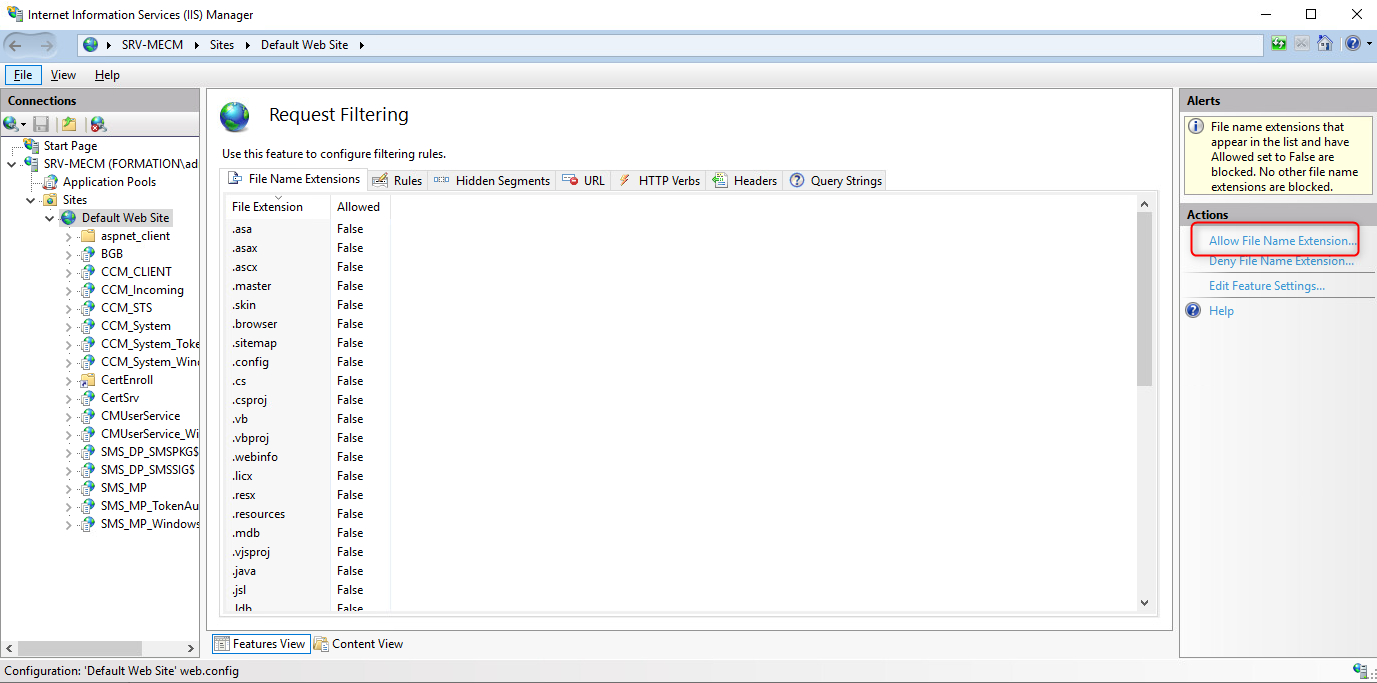
From the ADCS server (subordinate server), open to IIS console and select CertEnroll Folder. Click on Directory Browsing..

Click on Enable.

Select Default Web Site then click on Request Filtering.

Click on Allow File Name Extension in Action pane.
Enter crl in the dialog that appears.
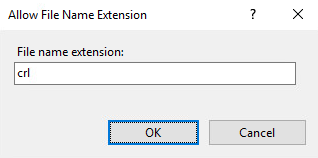
CRL extension has been added in IIS console.

Run the command IIS Reset to restart IIS services.

IIS is now been configured.
Configure Certificate template
From the Active Directory Certificate Services, right click on Certificate Templates and click on Manage.

Certificate Templates Console appear, right click on Computer template and click on Duplicate Template.

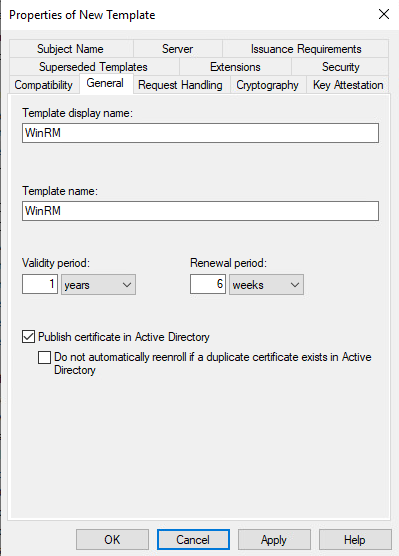
Configure Compatibility then click on General tab.

Enter the desired name and check Publish certificate in Active Directory.
Select Security tab and allow Enroll permission for Authentificated Users groups.

Select Request Handling tab and check Allow private key to be exported.

Select Subject Name and check Supply in the request.

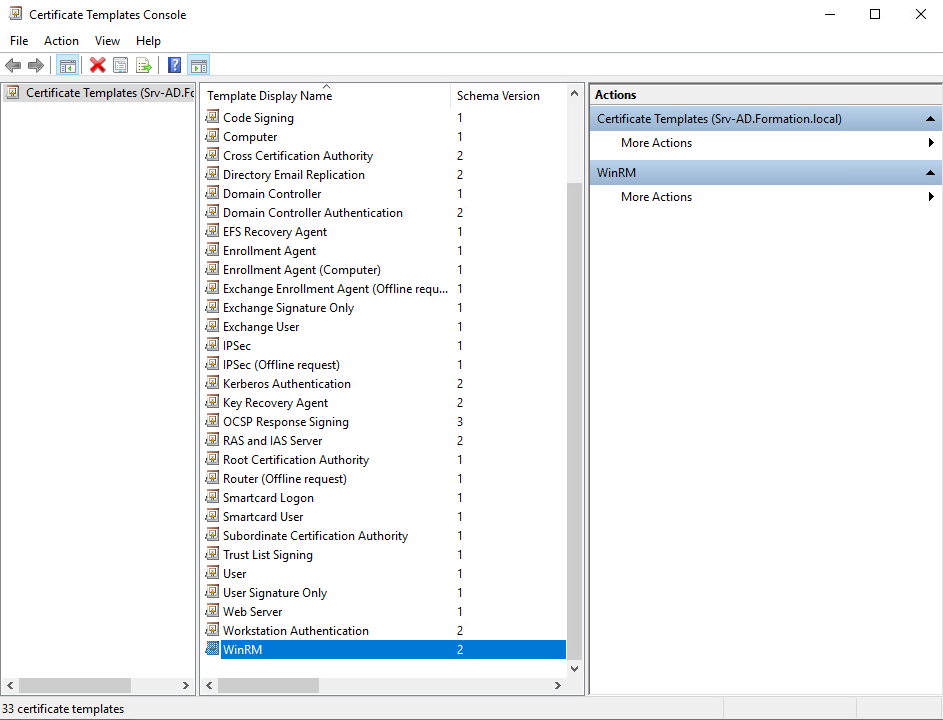
Click on OK, the template is now in Certificate Templates Console.
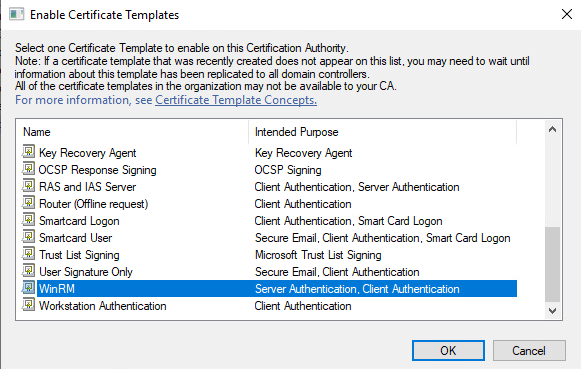
Right click on Certificate Template to Issue to add the previously created certificate.

Select WinRM template and click on OK.
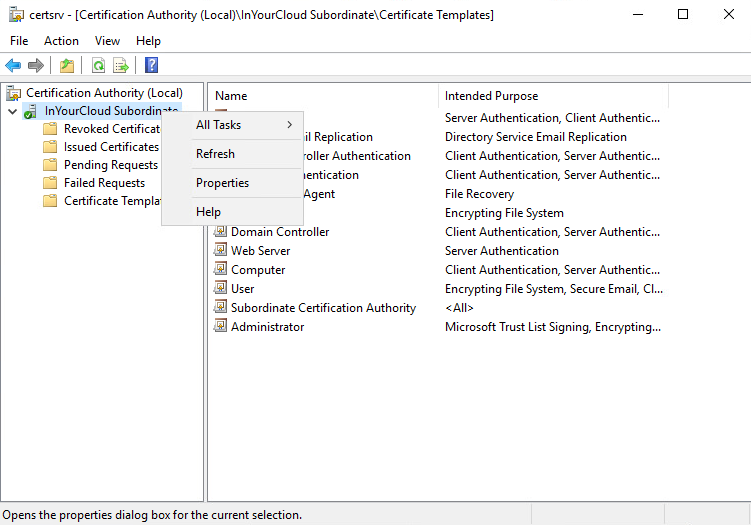
Extension in Authority Certification must be modify. Right click on Certification Authority and select Properties.
Select Extensions tab then select http extension. Check the following option.
- Include in CRLs. Clients use this to find Delta CRL locations.
- Include in the CDP extension of issued certificates.

Select Authority Information Access (AIA) and select http extension. Select Include in the AIA extension of issued certificates.

Click on OK then on Yes for restart Active Directory Certificate Services.
Issue certificate
The certificate must be issue on the server. My domain controller is the source server (he contain the events to send to sentinel). I use one of my infrastructure servers for collect all events that it is necessary to send to sentinel.
From the domain controller, open mmc console and add Certificate (computer) snap-in.
Extend Personal and right click on Certificates. Select All Tasks then on Request New certificate.
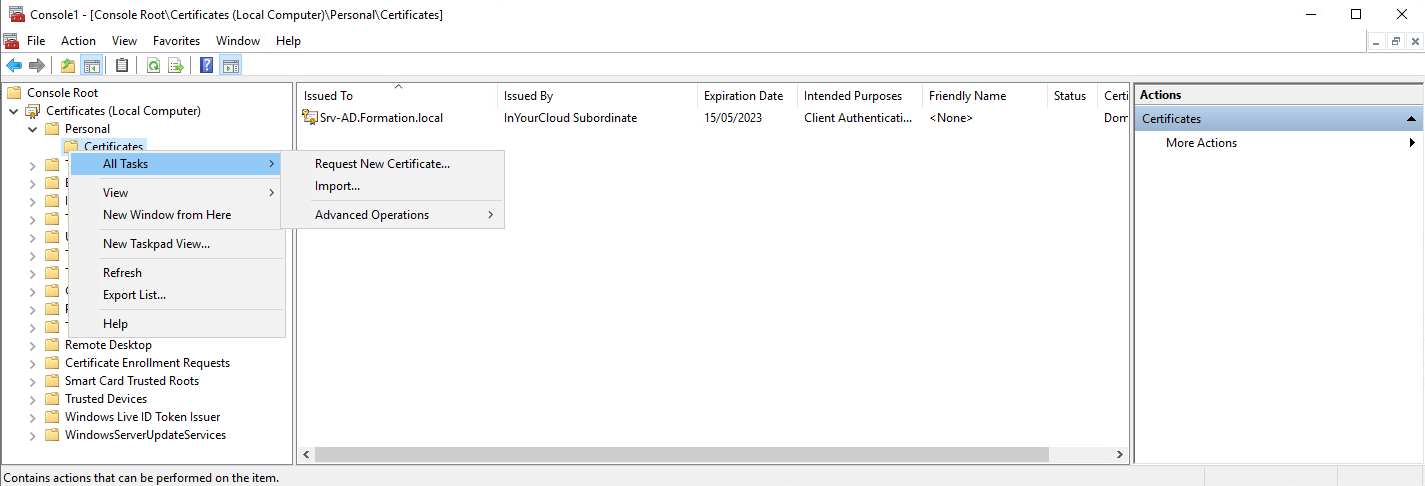
Select WinRM and click on More information is required to enroll for this certificate.
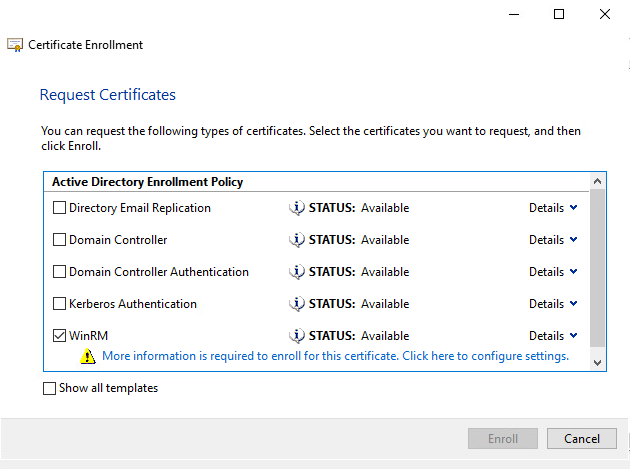
In the Subject name, select Common name then enter the FQDN of the domain controller. Click on Add.
Select DNS in Alternative name then enter the FQDN of the domain controller. Click on Add to add the name. Repeat the same action for the Netbios name of the server.

Click on OK then on Enroll. The certificate is now issue.
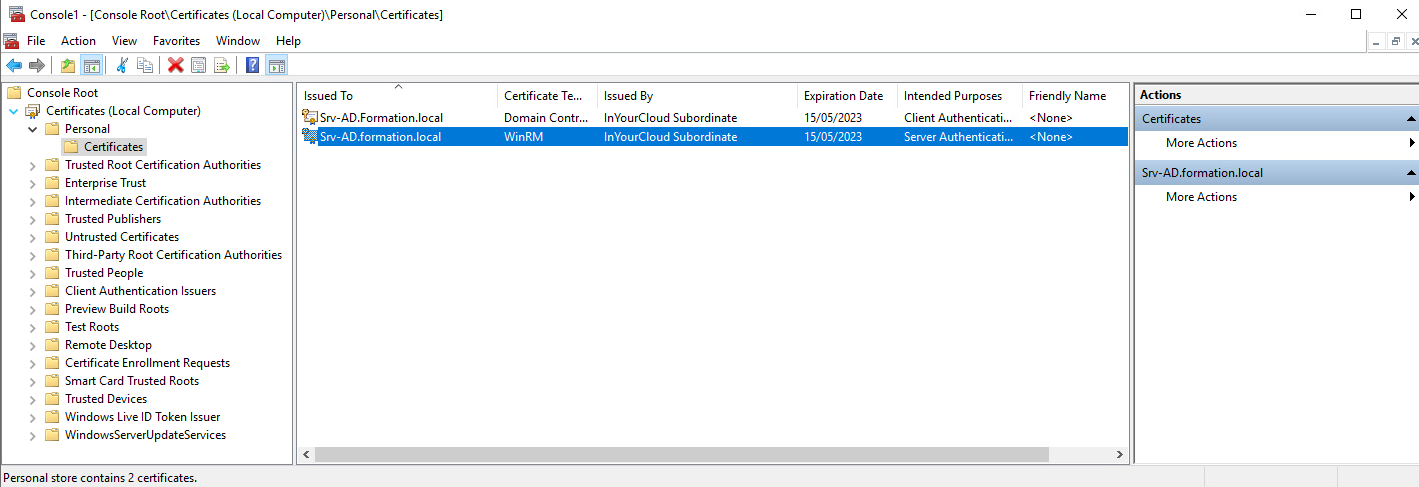
Certificate must be issue for the collected servers and the collector.
Create WinRM Listener
Before to create WinRM listener, you need to recover the thumbprint of the certificat. From the Collected server, open powershell console with administrative right and run the following command :
- cd cert:
- cd localmachine
- cd my
- ls
Copy the thumbprint of the desired certificate.

Open Dos prompt and run the following command (Enter the command manually as copy/paste may generate errors).
winrm create winrm/config/Listener?Address=*+Transport=HTTPS @{Hostname="serverfqdn";CertificateThumbprint="1fd53031caf98df226428069ccfdf3152b6ddc2b"}
Create firewall rules with the following command
netsh advfirewall firewall add rule name="Windows Remote Management (HTTPS-In)" protocol=TCP dir=in localport=5986 action=allow
The WinRM listener for HTTP protcol can now be deleted. Run the following command to delete the listener.
winrm delete winrm/config/Listener?Address=*+Transport=HTTP
The WinRM listener is deleted.

Repeat the same step for all servers collected and the collector.
Test WinRM listener
Before to create subscription, it’s very important to test WinRMs connection. From the Powershell windows run the following command
Enter-PSSession -ComputerName myHost -UseSSL -Credential (Get-Credential)
If connection is ok, you can create subscription.
Create Subscription
From the collector open a regedit console and modify the following registry key (this modification permit to two or more computers/servers connected to the same subscription.
HKEY_LOCAL_MACHINE \ SYSTEM \ CurrentControlSet \ Control \ SecurityProviders \ SchannelDWORD ClientAuthTrustMode must be set to 2
The listener must be configured to support certificate-based authentication. On the Collector server, open Command prompt and run the following command.
winrm set winrm/config/service/auth @{Certificate="true"}
Repeat the same step in other collected and collector server.
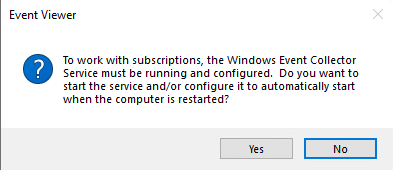
The subscription can be created. From the collector server, open Event viewer console and select Subscription. A message appear, click on Yes.
Click on Create Subscription in the Actions panel.

Enter the desired name and check Source computer initiated option.
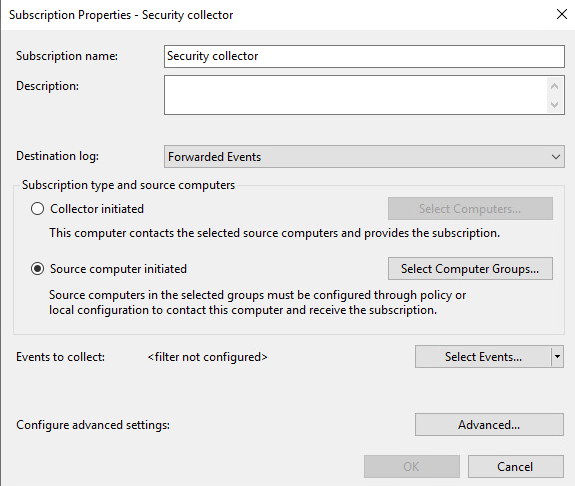
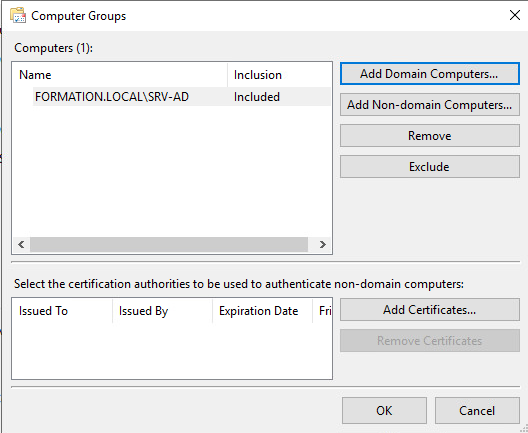
Click on Add Domain Computers for select the collected servers. Click on OK to validate selection.
Click on Select Events for configure filter. This filter is used for send only the desired events.

Configure filteras you want and click on OK.

Click on Advanced then select HTTPS protocol.

Click twice on OK. The subscriptions is now been created.

Configure collected server
From the domain controller, open mmc console with Computer certificate snap-in.

Right click on the previously issued certificate then click on All Tasks \ Manage Private Keys.

Add Network Service and assign read permissioon.

Create new domain group policy and configure the following parameter
Computer Configuration\Administrative Templates\Windows Components\Event Forwarding
Enable Configure target Subscription Manager and enter the following value.
Server=HTTPS://<FQDN of the Event Collector server>:5986/wsman/SubscriptionManager/WEC,Refresh= <Refresh interval in seconds>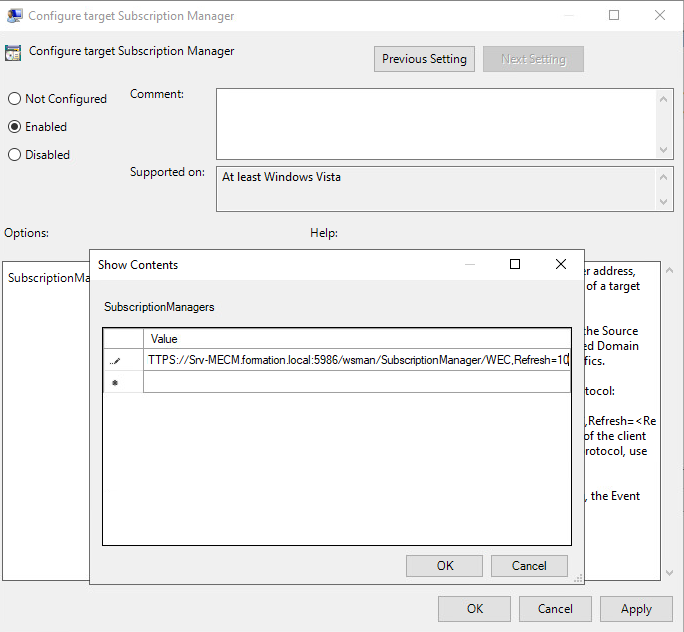
Link the group policy with domain controller organizational unit and restart the computer. The server is now been configured.

On the domain controller, open event viewer and access to the Eventlog-ForwardingPlugin log. You can see if there is an error or if all works fine.

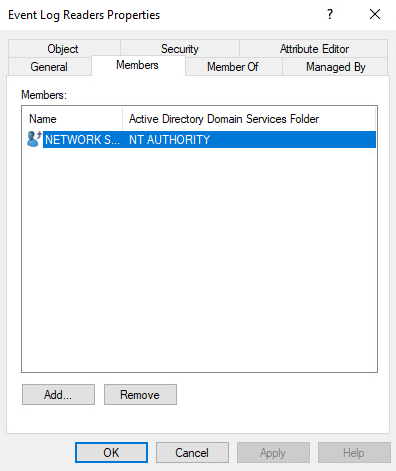
When i have implemented the subscription, i have the error : The subscription Security collector can not be created. The error code is 5004.
I have added on Event Log Readers group the Network Service account. After that I have restarted my domain controller.
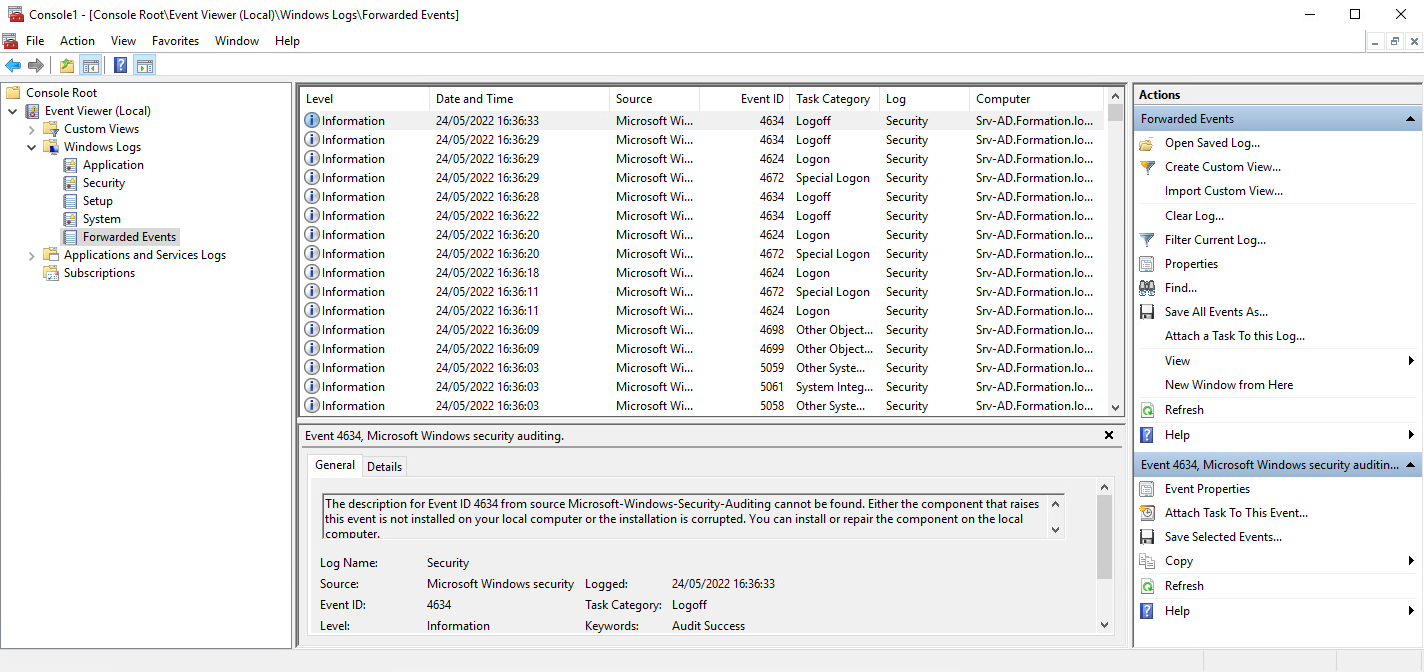
After the reboot, the event has send to the collector.

In the collector, the event has been fowarded.
Enroll collector server in Azure ARC
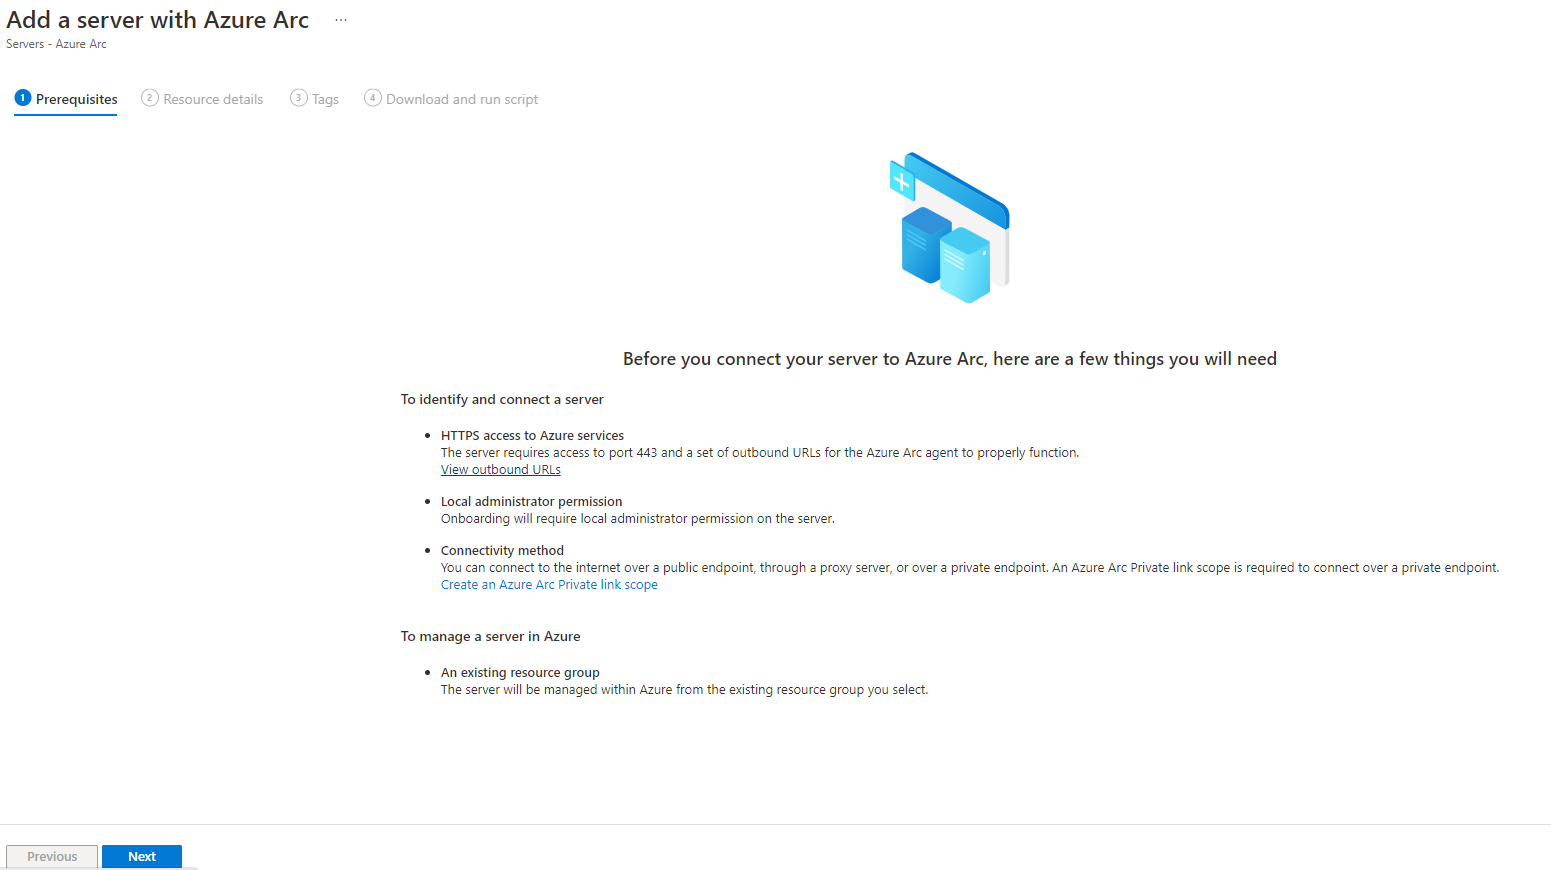
Capturing events in Microsoft Sentinel requires a connection to the Log Analytics workspace. The WEC (Windows Event Collector) server must be registered with Microsoft Azure ARC.
From the Azure Portal, enter Azure Arc in the Search bar and click on Azure Arc.

Click on Servers then on Add.

Click on Generate script in Add a single server.

Click on Next in prerequisites windows.
Select Resource Group and click on Next.
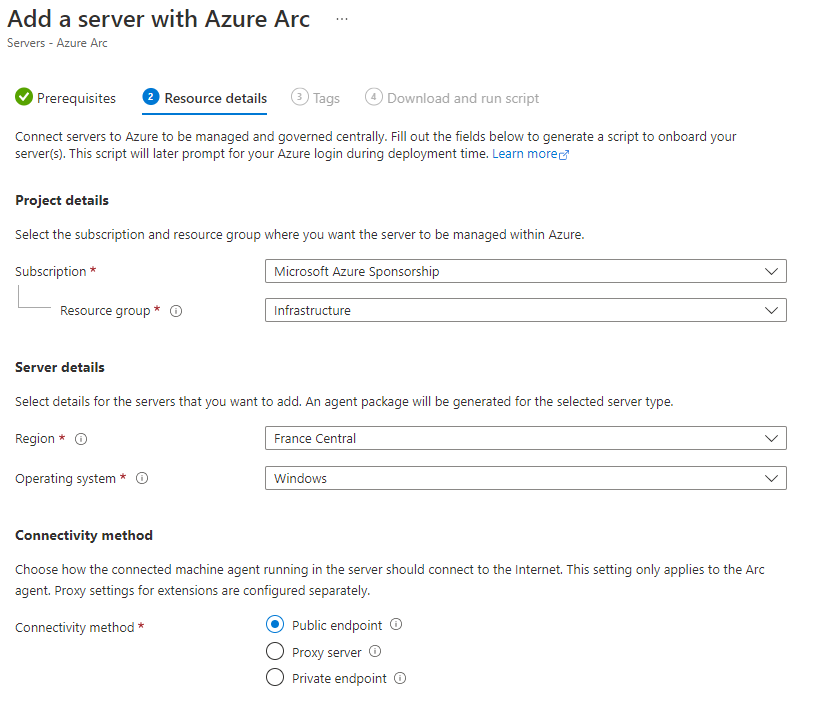
Configure Tags as you want and click on Next. Click on Download or copy Powershell script.
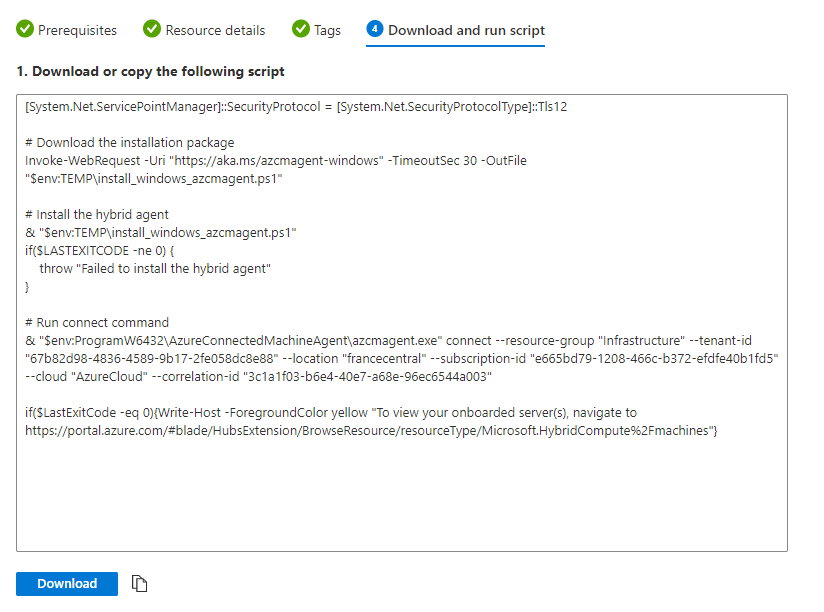
On the WEC Server, run the powershell script previously generated. Sign in in Azure with the browser
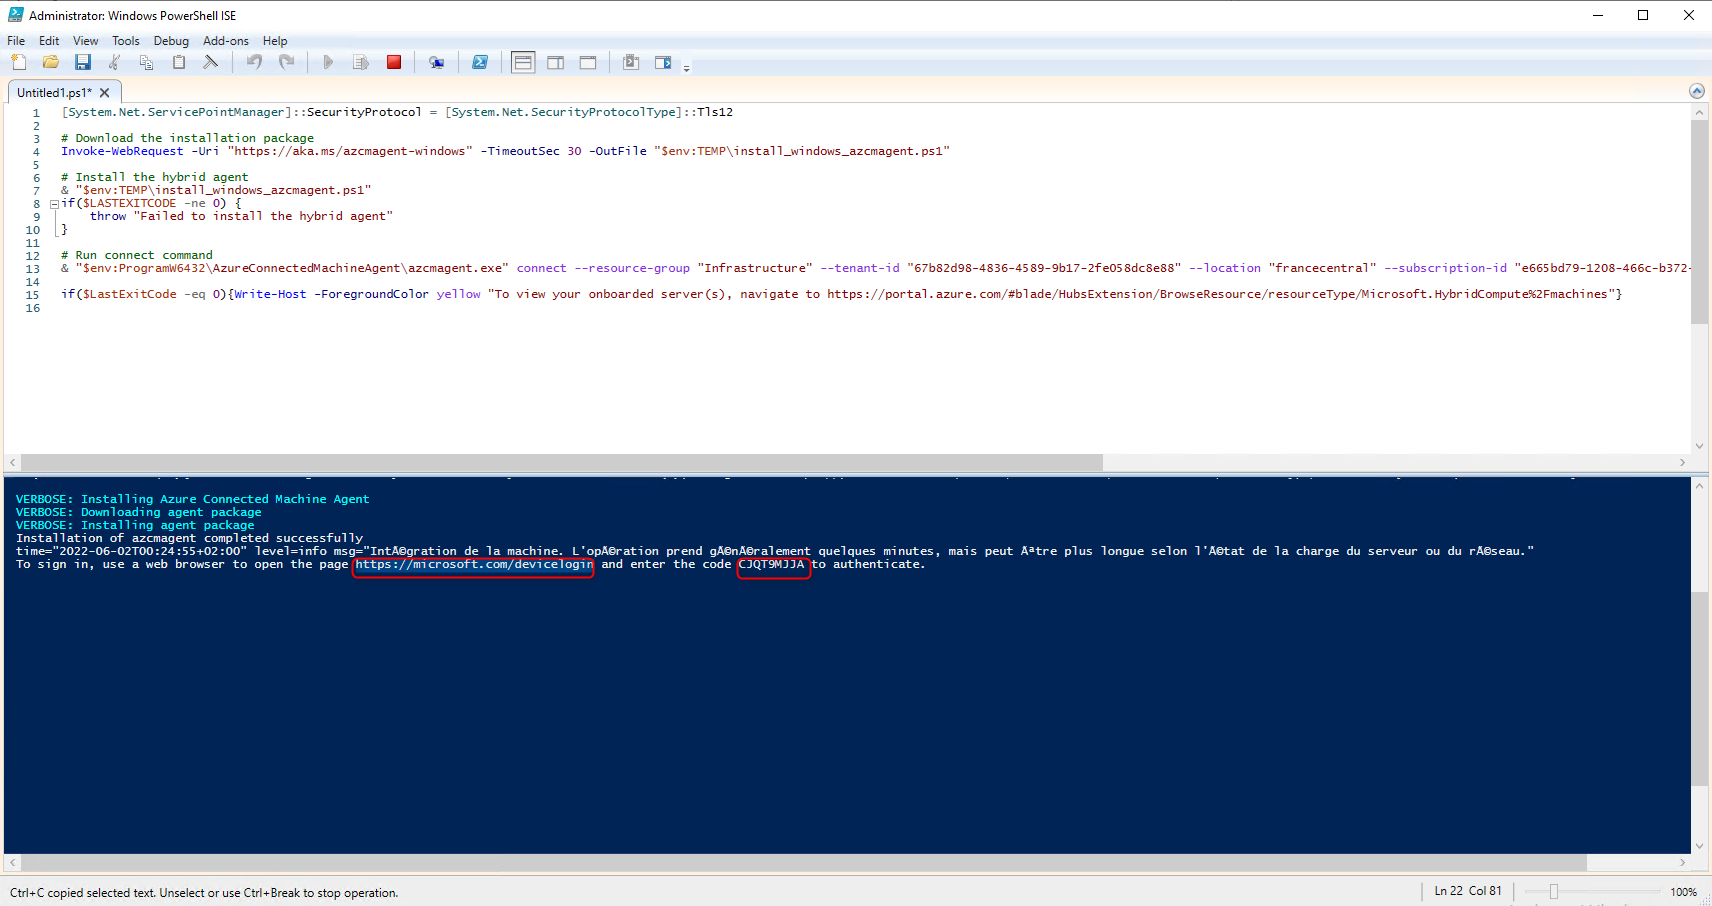
The server has been added on Azure ARC.

Add the Windows Forwarded Events Connector
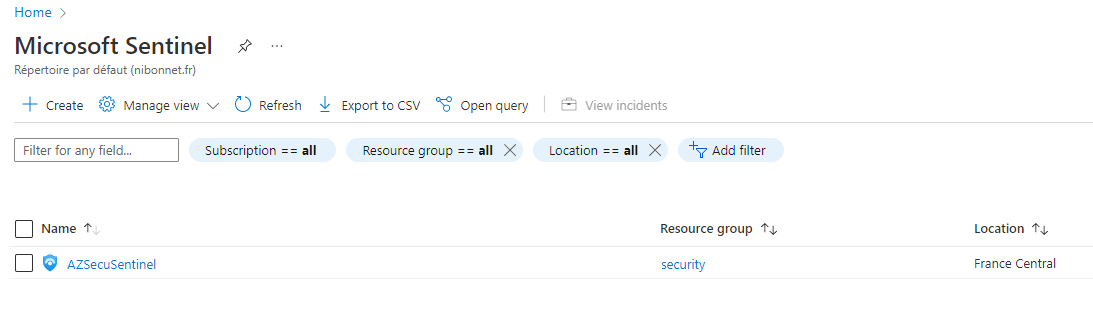
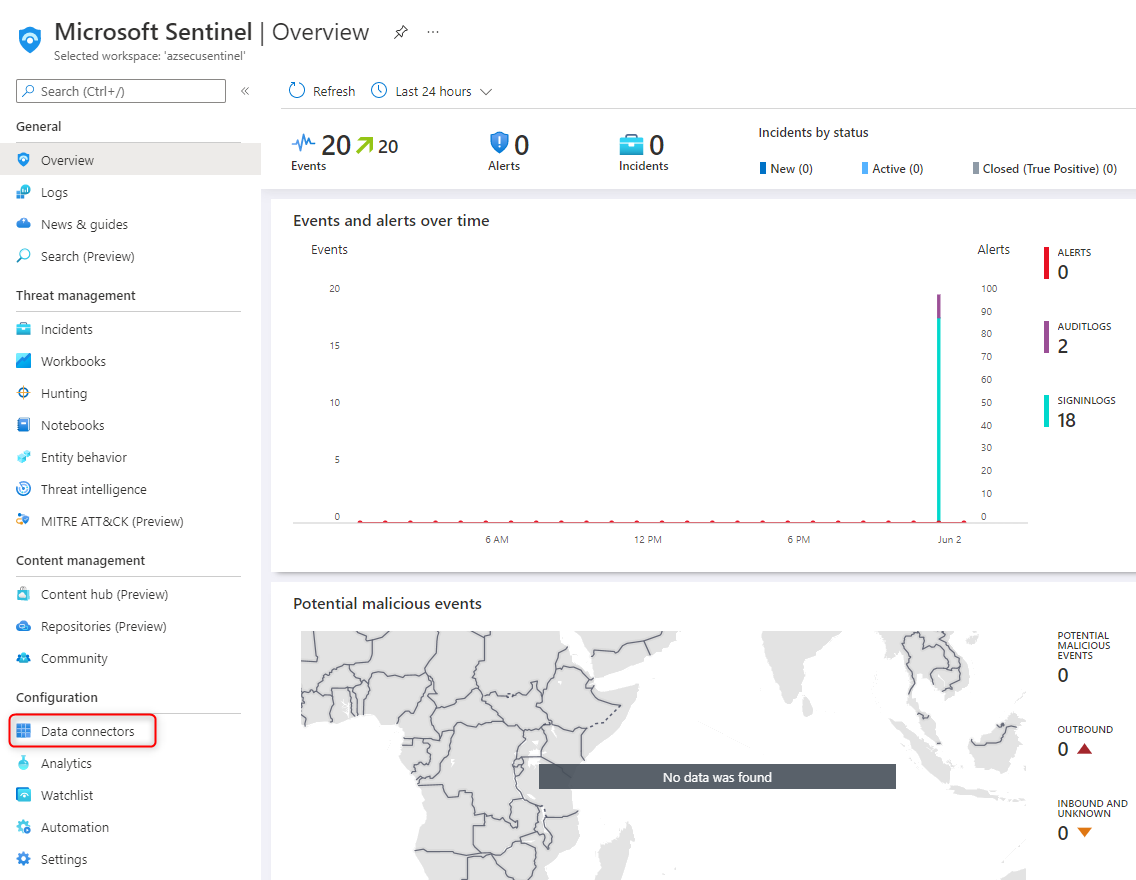
From the Azure portal, enter Sentinel in the search bar.

Select the Azure Sentinel Workspace.
Select the Data connectors blade.
Enter Windows Forwarded Event and click on it.

Click on Open connector page to configure it.

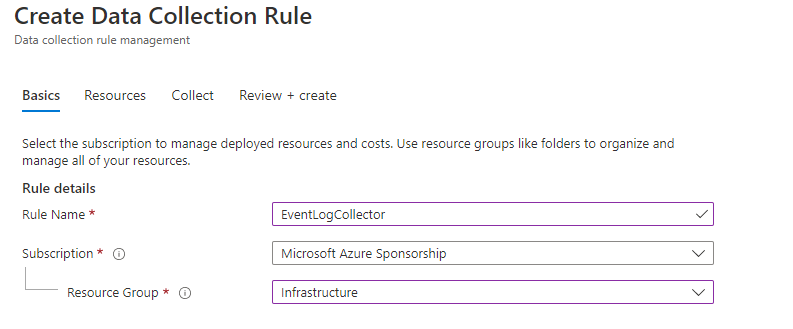
Click on Create data collection rule for enable data collection rule.

Enter Rule name and select Subscription and Resource group.
Click on Add resource and select the server previously added.

We can select all events or custom.

Click on Create. Data collection rule has been configured.

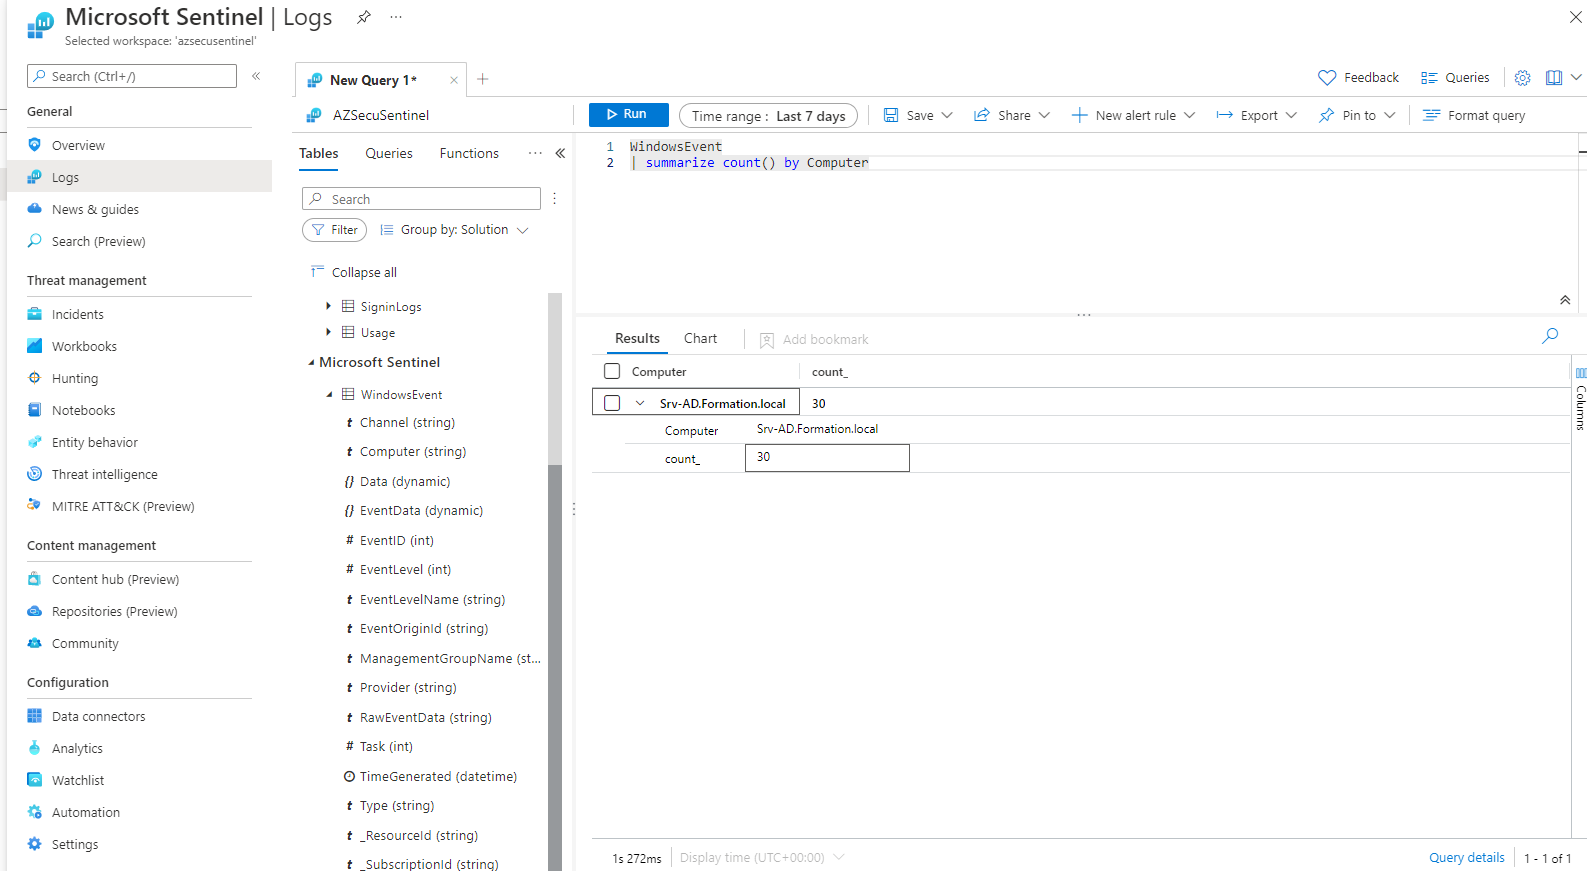
From the sentinel workspace, select Logs then close the windows that appear.

Enter the following query and click on Run.
WindowsEvent
| summarize count() by Computer